How can we help you today?
ADFS Single Sign On (SSO) Integration Guide
The instructions in this article are only applicable to MyWorkDrive installations using Active Directory for user identity. If MyWorkDrive is configured with Entra ID for the user directory, it uses a native Microsoft login and ADFS is not required.
This guide has been updated for MyWorkDrive Server version 5.2. Prior versions will find some of the names and locations have changed, and features specifically noted for 5.2 and above will not be available. Download the latest version of MyWorkDrive server here.
Contents
Introduction
Active Directory Federation Services (AD FS) is a technology that extends your Active Directory configuration to services outside of your infrastructure. With ADFS, you can give users access to MyWorkDrive using existing sign on credentials and integrate MyWorkDrive with other access portals such as Office 365 Web Apps for single sign on access (SSO).
This guide was written and tested on Windows Server 2012 R2 and 2016, earlier versions of Windows server are not unsupported for SSO ADFS integration.
Before beginning ADFS Integration with MyWorkDrive, confirm your ADFS is fully operational. The easiest way to verify your ADFS will authenticate you is to click on the link below (with your domain specified) https://fqdn.domain.com/adfs/ls/IdpInitiatedSignon.aspx
Once ADFS MyWorkDrive is completed, Optionally enable Two Factor Authentication with DUO using the guide located here.
Support for SSO capabilities within MyWorkDrive are only available on our Enterprise plans. Please contact our sales team if you are interested in upgrading your plan.
We recommend split DNS for the ADFS and MyWorkDrive Servers (internally the ADFS and MyWorkDrive servers resolve to internal IP Addresses) – our guide is here.
ADFS Setup -MyWorkDrive
1. Install MyWorkDrive Server on Windows 2016 or 2019 Server. Refer to the Server setup guide
2. Enable HTTPS in IIS on the Wanpath.Webclient site. See the Steps to Bind and Install SSL on your MyworkDrive client site for additional details. Self signed certificates are not supported, please use a certificate issued by a certificate authority.
3. TLS 1.2 is required by MyWorkDrive clients. See our article on configuring SSL/TLS for additional information.
4. Configure ADFS “Adding MyWorkDrive app as Relying party trust in ADFS” as specified below.
5. Enable the ADFS, File and DFS Servers as trusted by the MyWorkDrive Server for delegation per this article: Delegation Setup If your login to MyWorkDrive is successful, but there are no files or folders in your shares, that usually indicates missing or incorrectly configured delegation.
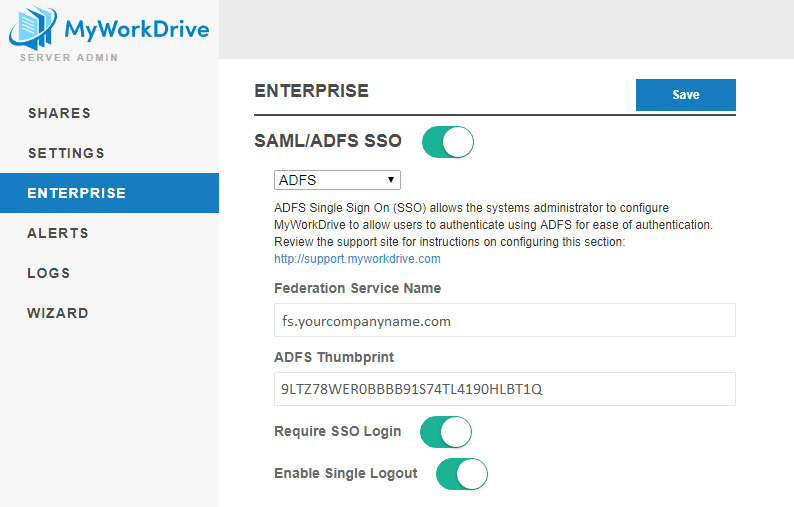
6. Configure MWD (admin panel – Enterprise Section)
Enable SAML/ADFS SSO
Select ADFS from the dropdown
Federation service name: Input your federation service name; how to get it: On your ADFS server connect to ADFS management – ADFS – edit federation service properties – federation service name)
ADFS Thumbprint: This information will be pulled automatically on saving Federation Service Name
Optionally, enable Require SSO Login. This will disable password based logins and redirect users to ADFS.
Optionally, enable Single Logout. When enabled, logging out of MyWorkDrive will also log the user out of ADFS.
An example of a completed ADFS configuration:
Testing
Use a browser to open your site with /Account/Login-SSO-ADFS.aspx appended to host name: e.g.:https://mysite.mydomain.com/Account/Login-SSO-ADFS.aspx
When accessing the URL you should be redirected to the AD FS login page (for example: https://mysite.mydomain.com/adfs/ls/?wa=wsignin1.0&wtrealm=https%3a%2f%2mysite.mydomain.com%3a8857%2f&wctx=rm%3d0%26id%3dpassive%26ru%3d%252fAccount%252fLogin-SSO-ADFS.aspx)
Login using a selected domain username (for example: YourDomain\YourTestUser), after successful login you should be redirected back to https://mysite.mydomain.com/Account/Login-SSO-ADFS.aspx which will then open the Web File Browser application and provide file access at https://mysite.mydomain.com/WebFileBrowser/WebFileBrowser.aspx
You should be able to browse folders/files and access them having signed on using ADFS SSO.
ADFS Server Setup
Adding MyWorkDrive app as Relying party trust in ADFS – 2012 Server
(Instructions for server 2016 appear below)
On your ADFS Server, Open Server Manager > Tools > ADFS Management. Expand “Trust Relationships” from left hand panel and select “Relying Party trusts” option. You will see that Device Registration Service is already present as a relying party. Now click on the option “Add Relying Party Trust” in the right hand panel.

The Add relying party wizard will appear. Click on the Start button to continue. Select the option “Enter data about relying party manually” and click on Next to continue.

Enter a display name for the relying party trust

Click Next to continue. In the Choose Profile window, select “ADFS Profile” option and click Next to continue. The ADFS configured on Windows Server 2012 is ADFS 3.0 – therefore we are not selecting 1.0 and 1.1 profile option.

In the “Configure Certificate” option, click on Next to continue (note skipping this optional certificate does not mean your ADFS login will use http when authenticating users, only optional token encryption)

In the “Configure URL” window, select the check box against the option “Enable support for the WS-Federation passive protocol”. In the text box put your relying party URL – your MyWorkDrive application URL; for example https://mysite.mydomain.com.

In “Configure Identifiers” we already have the required relying party added, therefore simply click Next to continue – unless you are using the Cloud Web Connector (a subdomain of myworkdrive.net) – in which case please see the instructions below for Using ADFS with the Cloud Web Connector before continuing.
On the next screen, select “I do not want to configure multi-factor authentication settings for this relying party trust at this time” and click Next to continue.

Select “Permit all users to access this relying party” and click Next to continue.

In the “Ready to add trust” window, click Next to continue. In the “Finish” window, select the checkbox to open the claims rules and click on Close.

The Edit claim rules window pops up. At this point, ADFS knows about your MyWorkDrive application but there a couple of additional things required. This is where we tell ADFS which claims need to be sent to the relying party and what values will be present in those claims.
Click on the “Add Rule” button.

Select template value as “Send LDAP attributes as claims”. Claims will be sent by Active Directory and Active Directory is a LDAP based store, therefore we are selecting this template. Now click on Next to continue.

In configure Rule window, provide the name for the rule as Send AD Attributes. Select the attribute store as “Active Directory”. In the mapping table, map the values as shown here

Click on Finish to exit the wizard and then click OK to complete claims rules configuration.
Adding MyWorkDrive app as Relying party trust in ADFS – 2016 Server
On your ADFS Server, Open Server Manager > Tools > ADFS Management. Expand “Trust Relationships” from left hand panel and select “Relying Party trusts” option. You will see that Device Registration Service is already present as a relying party. Now click on the option “Add Relying Party Trust” in the right hand panel.
The Add relying party wizard will appear. Select “Claims aware” and click on Start button to continue.
Now we are going to use URL to your MyWorkDrive application as relying party therefore we are providing the name as MWD Client application
In the “Configure Certificate” option, click on Next to continue (note skipping this optional certificate does not mean your ADFS login will use http, it would only add optional token encryption)
In the “Configure URL” window, select the checkbox against the option “Enable support for the WS-Federation passive protocol”. In the text box put your relying party URL – your MyWorkDrive application URL; example https://mysite.mydomain.com.
In “Configure Identifiers” we already have the required relying party added, therefore simply click Next to continue – unless you are using the Cloud Web Connector (a subdomain of myworkdrive.net) – in which case please see the instructions below for Using ADFS with the Cloud Web Connector before continuing
In “choose Access Control Policy” we already have selected “Permit everyone” we simply click Next.
In the “Ready to add trust” window, click Next to continue. In the “Finish” window, select the checkbox to open the claims rules and click on Close.
The Edit claim rules window pops up. At this point, ADFS knows about your MyWorkDrive application but there a couple of additional things required. This is where we tell ADFS which claims need to be sent to the relying party and what values will be present in those claims.
Click on the “Add Rule” button.

Select template value as “Send LDAP attributes as claims”. Claims will be sent by Active Directory and Active Directory is a LDAP based store, therefore we are selecting this template. Now click on Next to continue.

In configure Rule window, provide the name for the rule as Send AD Attributes. Select the attribute store as “Active Directory”. In the mapping table, map the values as shown below:

Click on Finish to exit the wizard and then click OK to complete claims rules configuration.
Using ADFS with the Cloud Web Connector
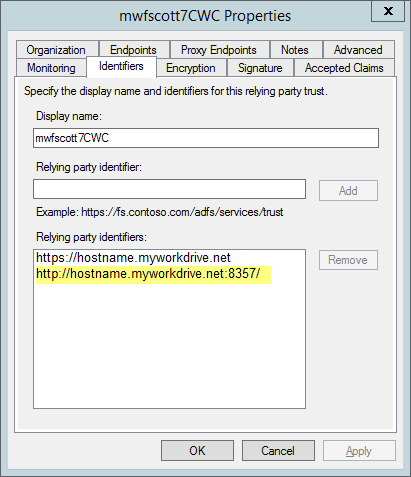
If you are using the Cloud Web Connector to publish your MyWorkDrive server to the internet, one additional step must be taking when adding the Relaying Party Identifiers to your Relying Party Trust Setup
In addition to the CWC address of https://hostname.myworkdrive.net (where hostname is your choosen server name); you must also enter a second identifier
http://hostname.myworkdrive.net:8357/
- note that it is http, not https
- note that it includesthe very specific port number :8357
- note that it includes a trailing forward slash
Failure to enter the second identifier exactly as entered (with the appropriate substition of your actual hostname for the hostname) will result in ADFS refusing to permit authentication and generating an ambiguous error.

Note that your enviornment may require other URLs depending on your network topology. As noted in this article, https://stackoverflow.com/questions/15445955/configure-adfs-to-become-a-identity-provider-in-thinktecture-identityserver-2-0, you may find other URLS noted in the AD FS Event Logs logs. To resolve errors, you may need to add the additional URLs as Relaying Partner Identifiers to the Relay Party Trust configuration.
ADFS Timeouts
The default TokenLifetime for ADFS sessions for the MWD website (relaying party) can be set on the ADFS server for a given RelayingPartyTrust. The default is 60 minutes. That means that your users will be re-prompted to login to MyWorkDrive via ADFS every 60 minutes.
You will note this by seeing 0 in the configuration (Get-AdfsRelyingPartyTrust -Name “MWD local site”).
If you wish to permit a longer timeout for ADFS logins, consider changing your ADFS configuration for the MWD website to a higher value – for example 480 (8 hours) or 600 (10 hours) minutes.
Additional details and a description are available on this blog: https://lazarus987.wordpress.com/2013/10/27/how-to-change-tokenlifetime-property-for-the-relying-party-object-on-adfs/
Changing the TokenLifetime setting
Run PowerShell as Administrator
Add ADFS snap-in to Windows PowerShell session
PS > Add-PSSnapin Microsoft.Adfs.PowerShell
Execute the following command to view the current setting
PS > Get-ADFSRelyingPartyTrust -Name “MWD Relaying Party Name” (name you created)
Note a 0 value in TokenLifetime property represents 60 minutes.
To configuring a different value for TokenLifetime, use the following command to set a revised timeout in Minutes.
PS > Set-ADFSRelyingPartyTrust -Targetname “relying_party” -TokenLifetime 480
Users will now be prompted to re-authenticate to MyWorkDrive based on the updated setting.


